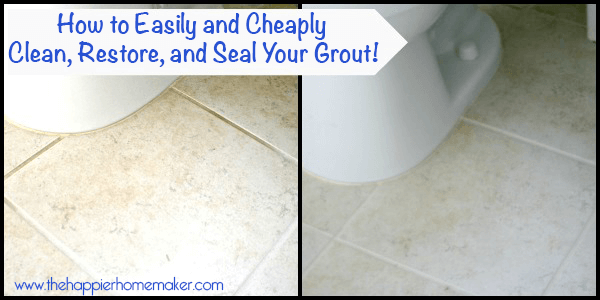
How to Clean, Refresh, and Seal Your Grout (Easily and Cheaply!)
This post may contain affiliate links. If you purchase through links on our site, we may earn a commission.

It’s easier than you think to clean your grout. With this tutorial, you can not only clean your grout but seal it to prevent stains too!
Next month will mark one year since we moved into our new construction home. When we were in the building process and went to the flooring supplier to pick our finishes I distinctly remember them telling us that they would not be sealing our grout.
Fast forward to the holidays and when the baby caused $5000 worth of water damage to the house by flushing a roll of toilet paper. Yeah, I was really wishing I had sealed that grout once the flooding permanently stained it.
Luckily the insurance company paid for the restoration and the tile specialist introduced me to this awesome stuff called Grout Refresh. I decided this past week that it was time to tackle the boy’s bathrooms because as you can see above..little boy lack of, ummmm, aim, has made their tile pretty cringe-worthy!
Supplies
- Gloves
- Sponge
- Dish Soap and/or mild cleaner such as Soft Scrub
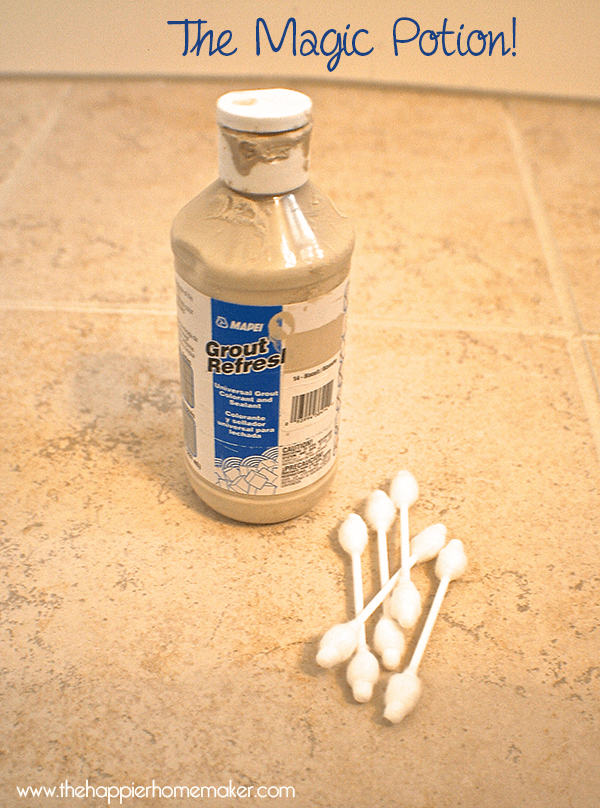
- Grout Refresh – I got my Grout Refresh for less than $15 and one bottle was more than enough to cover two standard full bathrooms.
- Toothbrush/utility brush/cotton swabs – I used Q-tips to apply my Grout Refresh but you can use a toothbrush or gloved hand just as easily.
Clean the Grout
It’s important to thoroughly clean the grout before you seal it so you don’t lock the yuck in!
- Mix dish soap and hot water and apply to the grout with a toothbrush. Let it sit 10-15 minutes.
- Brush the grout with a toothbrush and use a sponge and clean water to remove all of the soap mixture.
- If it doesn’t come clean consider a gentle cleaner like Soft Scrub.
Seal Grout
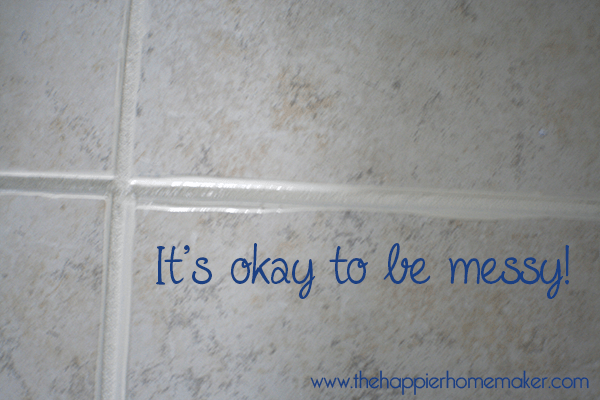
- Simply cover all the grout with the Grout Refresh-no need to be super neat-it won’t hurt to get it on the tile. The instructions tell you to wait 30-60 minutes after application and spritz with water. I can personally vouch that if you get busy with life and forget about it for, oh, 24 hours or so-that’s just fine!
- Spritz the grout with water and then wait five minutes.
- Scrub off the excess with a sponge. The Grout Refresh will easily clean off the tile while leaving the grout looking good-as-new! The actual labor time for each bathroom was less than an hour.
- Let the floors dry completely before walking on them.
And here is the difference again:
Isn’t it a huge (and totally less cringe-worthy) result? I wish I would have done it as soon as we moved in but I had no idea it would be so easy and so inexpensive!
Tips for best results
- don’t rush, it can be tedious but it is worth it in the end
- wear gloves to protect your hands
- use a gardener’s knee pad or folded towel to protect your knees
- sealers don’t last forever, plan on resealing floor grout every 3-4 years, less for shower grout
Have you sealed your grout? Anybody else have the same “little boy” issues I do? Bleh!


Great read! I’ll definitely be trying this at home. Very simple process and the results look awesome. Thanks!
Waterproof sealant is a vital part of any tiling process, especially when being used in frequently damp areas like bathrooms or outdoor areas. After you’ve laid the tiles and filled the joints with a good quality grout, it’s always best to treat both the tiles and the grout with a waterproof sealant.
What waterproof sealant would you use??
The Grout Refresh I used seals it in the same step as it changes the color! ~Melissa
Thanks for simple and easy budget tips , i will follow and get back to you for more suggestions
I am searching for the suggestions like this, great info and i will try these easy steps and let you know.
Thank you 🙂
Thank you so much for tip and it works for me. Otherwise I hate to clean tiles.
I want to try this! I liked the “Busuit” color as well because it’s a similar color to my tile. However I noticed in your pics that the paint on the bottle looks like a beige color, but your after pic of the tile looks white.Did it lighten as it dried?
it was a very light beige color Erika, the picture of the bottle was taken under flourescent light so isn’t true to the shade as it looked in normal light. The picture of the application (where it said it’s okay to be messy) is what it looked like straight out of the bottle. Sorry for any confusion!https://thehappierhomemaker.com/wp-admin/edit-comments.php#comments-form
Bought this product at my local Lowes in order to renew old grout lines on my kitchen tiles. I followed the directions exactly on the bottle. I have literally had to apply this stuff 5 different times.
First application: I waited 30 minutes and applied a light mist of water from a water bottle and waited 5 minutes. Wiped up the tile with a damp sponge and the grout lines started to peal along with the excess grout color on the tile. Very messy clean up.
Second application: Waited until the damp tile was dry and reapplied the product to the grout lines that did not take; waited an hour this time. Some grout lines took and again others did not; peeling from the grout lines once again.
Third application: Decided to re apply again on the grout lines that did not take and went to bed, thinking it would work better if I left the product on the grout lines overnight. Well this morning, nothing has changed. Some grout lines took and some did not.
Fourth application: After setting overnight, absolutely nothing has changed. I find myself once again applying the product to the grout lines that did not take once again. Using a sponge to wipe off the excess product from the tile; again some took and some did not.
Fifth application: Here we go again applying the product to the grout lines that did not take.
Bottom line is this product SUCKS! I would have been better off using regular paint to the grout lines and applying a clear epoxy. My fear is, now that I have applied this horrible product to my grout lines is that once I wipe the kitchen counter that this stuff is going to peel off, end up in my food and all over my kitchen floor. I will be contacting the company regarding this horrible horrible product.
I’m sorry you had such a bad experience Cherise, I’m not sure what would have made the difference. I used this product in 3 bathrooms, a laundry room and on our kitchen backsplash in our last home with no issues. The only thing I can think of is either the product formula itself has been changed since I used it (over 2 years ago now) or there was something on your grout that was preventing it from “taking.” But again, I never had that problem, our previous home was only a year or so old when I used it though so the grout was fairly new. Please let me know if you find out anything from the company that I can update my post with. ~Melissa
Melissa, I’ve to admit that I’ve never heard of this product before, but I will definitely try it in my next project. Thanks for the idea! I noticed it is colorant and grout sealer at the same time, which will be ideal for the moisture protection.
The blog you have posted is amazing. It gives me lot of ideas to work with my old and broken tiles. Thanks for sharing the blog about Tile and Grout Cleaning Services Mesa AZ.
Thanks for this tip! I am wondering what product you then used to seal the grout that you have now refreshed?
The Grout Refresh both changes the color and seals it Kimberly-so it’s all in one easy step!
Sometimes DIYers can damaged their floor if not using the proper products for each floor. You can visit my blog where I shared about most common mistakes in tile and grout cleaning done by homeowners: https://www.groutrhino.com/tile-cleaning-common-mistakes/
I just discovered this stuff…and OMG!!! It is the greatest!!! It took me 3 days to do 4 rooms but it was so worth it. It truly looks as if we just installed our tile floors (they are 11 years old). The hardest part of the process is being on the floor … LOL!!!
To anyone with doubts, I swear you will NOT be disappointed. It was the best $11.97 I’ve ever spent!!!
This is really interesting, You are a very skilled blogger.
I have joined your rsss feed and look forward to seeking more of your great post.
Also, I’ve shared your site in my social networks!
Thanks for the valuable advice!|
I bought mine at Lowe’s. Using a atoothbrush maxed it so easy. How do you seal it?
They have a solution for everything don’t they! Informative post — and yes, anyone with a boy has the issues as you describe!
Ok, so maybe I missed something, butI didn’t know this came in different colors. I was expecting a miraculous grit cleaner not a “colorer” . 🙁 My local Lowe’s also doesn’t carry many shades. Rats!
That should be grout not grit…autocorrect…smh
Sorry that wasn’t clear Rebecca, basically if you choose the same color it will “restore” it, I’ve also used it to change grout color in my kitchen after I regretted my backsplash grout color choice! In that case I couldn’t find the color I wanted locally so I ordered it on Amazon.
Thanks for the reply, Melissa. My grout is grey and the only shades at my local Lowes were white and tan tones. The salesman recommended another cleaning product and that (with a handy stiff bristle grout brush) seems to be working pretty well in one of my bathrooms. If I decide I need the Refresh for other areas, I’ll know to check Amazon. Thanks for the info! Great blog, btw!
WoW! I have never heard of Grout Refresh before! It sounds so easy and effortless! I am sooo gonna try it out! I usually use Kaboom or Soft Scrub with grout cleaning. Another routine method for me is to spray the grout with vinegar and let it sit for 10 minutes before scrubbing and rinsing. I guess it’s about time to try something new! Thanks for sharing this post!
Glad it could help Yuna! It’s amazing stuff!!
Thank you for the grout-cleaning tip. I expect it will work well on other items too, like cleaning faux-granite look countertop maybe. As for the little boy problem, cannot some one (a grown up man, for instance) teach them how to aim better, ahem? Or tape wads of paper towels around the outside of the bowl??? Ewwww! Guess you can tell I’m not a mom, LOL!
Oh Jan we’ve tried!! The thing is getting distracted and they turn to look at something and boom-big mess! Maybe I should hang very interesting pictures directly over the toilet!?
Easily distracted, oh my! Well, I don’t want to post adult-only content about what kind of picture might serve as a distraction and where to put it, LOL! Perhaps we, meaning USA, need to re-think how we do plumbing in our homes. While I have not personally seen such a set-up, I understand that many homes in Europe have toilets, bidets for the ladies, and urinals for the men, so three plumbing fixtures just for doing the necessary. Even if we eliminated a bidet from the design in the average homestead for the USA, we could still have a toilet and a urinal — a WIDE urinal with a large basin/base designed to catch, er, distracted aim. Unfortunately, I don’t think aim necessarily gets better with age, ahem.
Jan if we had a urinal my life would be so much easier-not that I ever imagined myself thinking that phrase!!!
Hmmm, just wondering if aim might markedly improve if the “aimer” had to clean up after himself/themselves by pulling bathroom clean-up duty every couple of days under mom’s tutelage. Personally, I have over the years become convinced that this is one of the main reasons that men get married – to finally not have to clean their own toilets anymore. Perhaps it is time to pull a SWITCHEROO and require the males in the household to clean up after themselves — sort of like Wife Swap, but this is Icky Chores Swap.
can we use this in the shower ( for shower tiles as well ? )
Hi Sari, we did actually use this in our shower and have not had any issues with it.
I have been after my husband to do this job for a while. I guess I can do it 🙂 That will be a fun surprise 🙂 We have a weekly link up party at allthingswithpurpose.com. We would love to see this post there along with the post on dying your jeans!! We are also your newest FB like 🙂
Sorry I see the jeans were from someone else 🙂 Buggy eyes 🙂
Thanks so much! I’ll be sure to pop by and link up when I get home on my “big” computer!